> For the complete documentation index, see [llms.txt](https://docs.synergyreef.com/llms.txt). Markdown versions of documentation pages are available by appending `.md` to page URLs; this page is available as [Markdown](https://docs.synergyreef.com/installation-manuals/the-synergy-reef-shadow-overflow/v1-v2-and-v3-overview.md).
# V1, V2 & V3 Overview
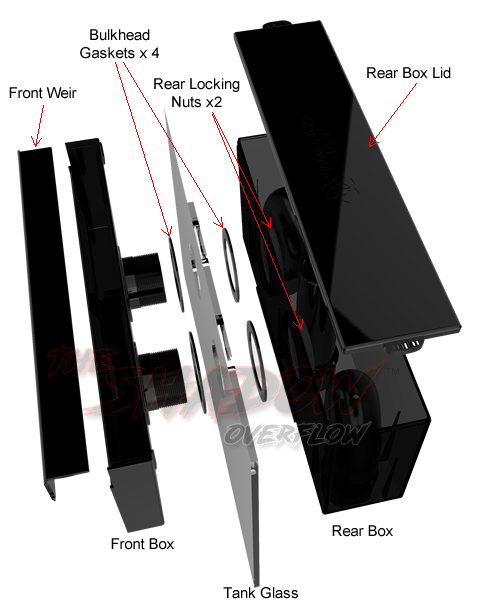
Thank you for choosing the Synergy Reef Shadow® Overflow. The original Shadow V1 was introduced in 2016. The V2 was released January of 2020. And the V3 was released on March of 2022.
They all have a sticker located on the bottom of the rear overflow with a serial number.
* V1 Serial Numbers 0000-5000 - The sticker will only say "Shadow Overflow"
* V2 Serial Numbers 5000-7000 - The sticker will say "V2 Shadow Overflow"
* V3 Serial Numbers 7000+ - The sticker will say "V3 Shadow Overflow"
**The holes that are Drilled into the tank all use the same template for V1, V2 & V3. Nothing has changed in the hole patterns.**
***These installation instructions are for Our*** V2 & V3 ***overflows with a serial number 5000 and up.*** If your overflow has a serial number less than 5000, please do not use these instructions and use the[ instructions for the V1 Shadow® overflow.](/installation-manuals/the-synergy-reef-shadow-overflow/shadow-r-v1-installation-manual.md)
{% hint style="info" %}
The V3 now includes a ***Quiet Flow™ Weir*** design which uses an internal plate inside the front box of the overflow. Please make sure to remove the tape that holds this in place during shipping. The Front weir plate may also need to be removed and cleaned from time to time, but should be almost maintenance free. See [Internal Front Box](/installation-manuals/the-synergy-reef-shadow-overflow/internal-front-box.md)
{% endhint %}
* *If you need to drill your own aquarium then proceed to* [Drilling Your Aquarium](/installation-manuals/the-synergy-reef-shadow-overflow/drilling-your-aquarium.md)
* *If your aquarium is already PRE DRILLED for the Shadow Overflow then proceed to* [Attaching the Overflow to the Tank](/installation-manuals/the-synergy-reef-shadow-overflow/attaching-the-overflow-to-the-tank.md)
{% hint style="danger" %}
***Please note that this is an Advanced level Do-It-Yourself project and can be installed in either glass or acrylic aquariums. Due to hundreds of different aquarium setups, pumps, sumps, ect, Synergy Reef DOES NOT Provide specific tuning assistance with this overflow. We can provide basic installation assistance, but setup and tuning to your aquarium is up to you. If you are not capable of doing this, please hire a professional to do so.***\
\
Always keep in mind that working with power tools, glass and acrylic have inherent dangers, including personal injury, electrocution, accidental death, or cracked glass, so please be careful and wear gloves, shoes, pants, eye protection, etc… You are installing this at your own risk! If you have any questions or concerns, please [contact us](https://synergyreef.com/contact-us/).
{% endhint %}
{% hint style="success" %}
\*\*\*\*We include a small plastic piece with the overflow to use as a key to remove the front snap fit weir. You can use this or any small item to remove the weir. Figure A.4 shows what the key looks like.
{% endhint %}
